Tuesday, November 11, 2014

Acorn Bites

Acorn Bites
Whoa...who am I?! Am I really trying to come back to writing this blog after MORE THAN A WHOLE YEAR!?  First before any food talk, a little bit of insight on my life the last year for my 5 viewers :)

Well, what can I say?  I officially took a hiatus from this food blogging business for the first year of my marriage!  I got married October 26th, 2013 to the love of my life, Faraz! From my last blog (July 30, 2013...again who am?!) I was really stressed the last half of 2013 planning my wedding and moving out of my parent's house.  (Check out my friend's blog, Farhana from Engineered Baker, to see some pics from our wedding!) If you are married you know how it is, you get caught up with being married.  The first year has been quite the adventure with getting used to living with someone, getting a routine going, getting things around the apartment set up, going on trips, having dawaats, etc.  But a year later, I have to say, WE HAVE IT DOWN!  We have an amazing routine and honestly we compliment each other so well.  I cook, he cleans :) I mean, come on, how can it get better than that?!  Anyways before I get on with food talk, here are a couple pics from our beautiful 3 day wedding :D

October 25th, 2013 - Gaye Holud / Mehndi
Faraz and I :)
My bridesmaids!

October 26th, 2013 - The Actual Wedding!
     
Bridesmaid and Groomsmen can't even keep us apart ;)
Fall is definitely my favorite season now!
October 27th, 2013 - Walima / Wedding Reception!

Okay so now that I got my wedding out of the way, on to food talk.  Now that I live on my own and can't rely on my parent's cooking food, I have been cooking a lot, and I mean a lot! You know how they say the first year of marriage you eat out a lot?  Not us, we almost NEVER eat out unless it's a special occasion.  My passion for food has found a new level this last year which is why I haven't really blogged.  I cook so much that it just slips my mind to step a side and take pictures of it all.  But I promise, I will try to get back into blogging.  I have experimented a lot this past year, and I want to share it all with you all!  

So on to today's very easy recipe that requires no baking or cooking! Just a little assembling that is easy enough for kids to do.  I have made this almost every Thanksgiving for the last few years.  It's something my sister and I (and now Faraz) do together :)  Try it out as a cute little nibbler for your Thanksgiving table this year!

Ingredients for Acorn Bite
Ingredients (75-80 acorns):
1 - 12oz bag of Hershey Kisses (any kind works, I used Caramel filled ones for mine)
1 box of Ritz Bits (Peanut Butter tastes best!)
75 - 80 mini chocolate chips (milk chocolate or semi-sweet)
1/4 cup vanilla frosting

Instructions:
1. Unwrap all the Hershey kisses. Place them on a plate.  
2. Frost the bottom of the Hershey kisses, stick one Ritz Bit to the bottom of the Hershey kiss.
3. Frost a little dot on the top of the Ritz Bit, stick one mini chocolate chip to the top of the Ritz Bit.
4. Let dry for at least 30 mins.  Repeat until you run out of all the Hershey Kisses.  
5. Decorate all the acorns on a pretty plate and add them to your Thanksgiving spread! 
6. ENJOY!
 

Tuesday, July 30, 2013

Mediterranean Couscous Salad


Mediterranean Couscous Salad
Hi again! So this time it didn't take me a whole 3 months for my next post! Whoooooohoooo, someone congratulate me! I really do want to try and blog more often, I promise! I love writing and letting my 5 viewers learn new recipes that I have tried and loved!

Wedding planning has officially taken over my life, but I have to say, if I didn't have Faraz (my fiance), I would be so much more busy, not to mention stressed! He has been helping out so much! (I can be as sappy as I want on here, because Faraz never reads my blogs!)

Oh and one last thing before I start talking about my recipe today.  I want to give my girl, Farhana, a shout out.  She is one of my newest bloggers that I love checking out, and I like to think we keep each other motivated with these blogs! You can check her out here!

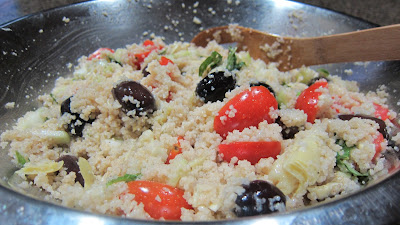
Anyways, so I made this dish thanks to a friend. She inspired me! She made this for iftaar (breaking fast meal) for her family, and I wanted to attempt it myself! It turned out quite delicious! I loved how light yet flavorful it was! So go on and give it a try, you won't be disappointed :)

Ingredients for Salad
Ingredients (6-8 servings):
1 cup uncooked couscous
1 cup grape tomatoes
1/2 cup cucumber
1 cup artichoke hearts
1/2 cup cups chopped kalamata olives (pits removed)
1/4 cup fresh basil
1/4 cup feta cheese (optional)

-----Dressing-----
1/4 cup olive oil
1 large lemon (juice)
2 cloves garlic
1 tablespoon chopped fresh basil
1/2 tsp salt 
1/2 tsp pepper

Instructions:

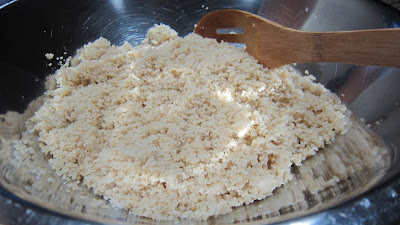
1. Cook the couscous according to package instructions. For mine, I have to boil about 1 1/2 cup water, stir the couscous in, turn off heat, and cover it for about 5-6 minutes. So simple!
2. In a small bowl, whisk together the olive oil, lemon juice, garlic, and basil. Season with salt and pepper. Let marinate while you move on to next steps.
3. Slice the tomatoes, dice the cucumbers, cut the artichoke hearts, slice the kalamata olives, and chop the basil.
2. Place the couscous in a large bowl. Add the tomatoes, cucumber, artichoke hearts, kalamata olives, and basil.
4. Pour the dressing over the couscous salad and stir until well combined. Add salt and pepper to your own taste. If you want to top with feta cheese, you can at this point (totally worth the extra calories!)
5. ENJOY!

Tuesday, July 16, 2013

Balsamic Watermelon Cucumber Salad

Balsamic Watermelon Cucumber Salad

So I am definitely not even going to talk about how long it's been since my last blog.  It's been long, I know! My excuse, you ask?

I AM GETTING MARRIED! Hahaha, it's been a crazy few months, getting engaged, planning a wedding, getting ready to move out! Crazy, but very, very exciting! It also means I have been pretty darn busy, but I wanted to get back into blogging.  I mean I do love cooking, but after a long day at work, and various wedding appointments, the furthest thing on my mind is food!  I also have to take advantage of my mom's cooking for as long as I can! In a few months, I won't have anyone to cook for me anymore (let's face it, my fiance can't really cook!).

So here I am blogging, but no promises on exactly how often I am going to be doing this.  Just often enough so you don't forget about me!

As many of you know, Ramadan has started, which means long days of no eating and drinking when the sun is up! I live in Seattle, where daylight is around 15-16 hours.  That's a longggggg time of NO EATING/DRINKING! On top of that, it's been very nice in Seattle! It's currently 80 degrees right now (and 7:58pm, almost time to eat!).  But all this makes me want to eat chilled salads! Of course as a side meal since, come on, after a long day of fasting, I can't just feast on salad!

Alright, so I made this salad yesterday for myself (thanks to the lovely Gina), I didn't want to make too much just because I wanted to see how I liked it.  It turned out quite delicious actually, and I will definitely be making it again! Watermelon is definitely in season, so it's always at my house! This salad was for about 2 people and I thought I would have the leftovers today except my dad ate the rest last night! Desi parent approved! :D Anyways, enjoy the recipe!

Ingredients for Salad
Ingredients (2-3 servings):
2 cups watermelon
1/2 medium cucumber
1/8 cup kalamata olives (pitted)
1/8 cup crumbled feta cheese
1/2 tbsp fresh basil
1/8 cup balsamic vinegar
1/2 tbsp brown sugar

Instructions:
1. Dice the watermelon and cucumber. Slice the kalamata olives. Chop the basil.
2. In a small sauce pan, pour the balsamic vinegar and brown sugar.  Place over medium - high heat until brown sugar is dissolved, then reduce to low heat and reduce glaze to about half the amount (about 8-10) minutes.  (You can also just buy balsamic glaze).
3. In a medium bowl, place the watermelon, cucumber, olives, basil, and feta.
4. Add about 1 tbsp of the glaze (more to taste) to the top of the salad.  Toss just to mix everything.
5. ENJOY!

Sunday, February 17, 2013

Chunky Guacamole

Chunky Guacamole
I know, I keep promising that I am going to update my blog more frequently, and then I don't.  So now I am not going to be making any promises.  Once a month? Haha, I can't even use the excuse of being busy.  I am less busy (but more tired) than I was last year when I started this blog.  Oh well, as long as I keep cooking, I guess that is all that matters.  My new goal, twice a month!

Anyways, this is my favorite guacamole recipe! Everyone absolutely loves this whenever I bring this over.  This recipe is intended for about 20ish people, so please make accordingly.  I was requested this recipe so many times, and I am terrible because I am just making the blog for it! Anyways, enjoy!

Ingredients for Guacamole
Ingredients (18-20 servings):6 hass avocados
1 can sweet corn (15.25 oz)
1 can black beans (15 oz)
1 cup onions
1 of a red bell pepper
1/4 cup black olives
2 roma tomatoes
1-2 serrano pepper
1 tbsp garlic
1 /2 cup of cilantro
3-4 small limes
1 tsp of salt
1/4 tsp black pepper

Instructions: 
1. Dice the avocados.f  A trick with avocados  is you want to cut them while they are in their shell and then take them out.  In a medium bowl, place the diced avocados and squeeze 2 of the small limes and mix the avocados up well.  Make sure to keep the avocados in small cubes and not smash them up.  This is why this avocado is consider chunkier than others. 
2. Dice the onion, bell pepper, tomatoes, serrano pepper, mince the garlic, and cut up the cilantro. Take each olive and slice them horizontally (Sometimes you can find cans that have olives sliced for you).  
3. Mix all ingredients (Step 1 and 2) together with the corn and black beans and sprinkle salt and pepper on top.  Squeeze the rest of the limes as well on top.  Combine all ingredients and taste to see if more salt, pepper, or lime juice is needed.  
4. ENJOY!

Monday, January 7, 2013

Mint Chocolate Chip Clouds

Mint Chocolate Chip Cloud
Hi everyone! HAPPY NEW YEAR! I cannot believe it's already a whole new year! Can you believe it was only a year ago that I started this blog?! A whole year has already passed.  That's craziness! Things to be proud of: starting this blog, graduating college, starting a real job, and traveling a little more than usual. What's my new years resolution you ask? Well there are the cliche ones of losing the stubborn 10 pounds (so hard!), eating healthier (more green smoothies), blogging more than last year, maybe try video blogs for food, and finally doing something that is going to change my life forever (I'm going to keep that a secret for now).  What are your new year's resolutions?

Okay, so I made these cookies a while back, but they are absolutely delicious.  Very few calories per cookie, mostly the calories come just from the chocolate chips! My girl Gina is owner of this recipe and man did she do an amazing job! I took a bunch of these to work and it was an absolute hit.  Since starting to work, it's awesome whenever I have extras of goodies, I just go ahead and bring them to work! Anyways give these a shot, believe me you won't be disappointed!

Ingredients for Cookies
Ingredients (30-35 cookies):
3 large egg whites (room temperature)
1/8 tsp cream of tartar (spice aisle)
1/2 cup sugar
1 tsp vanilla extract
1 cup dark and mint chocolate chips

Instructions:
1. Preheat oven to 300 degrees.  Line cookie sheet with parchment paper.
2. Using a mixer (I used my Power Advantage Plus 9-Speed Hand Mixer), beat the egg whites and cream of tartar on high until soft picks.  Soft picks are when you pull up the mixer and the mixture stands up slightly.  
3. Slowly add the sugar, 1/8 cup at a time, beating the mixture the whole time.  Then add the vanilla extract.  The sugar should be completely dissolved leaving everything glossy.  
4. Fold in the dark chocolate and mint chips.

5. Drop the mixture by spoonfuls on the cookie sheet.
6. Bake cookies for about 40-45 minutes until the cookies are dry.

7. Cool on wire rack for about 10 minutes.  
8. ENJOY!

Saturday, December 8, 2012

Dirt Pie

Dirt Pie
Hi everyone, okay I know I am a terrible person that makes promises about my blog and never follows through.  I have no idea what it is, but it's almost like when I was more busy, I made it a point to post blogs, but now with more free time, I just don't feel like sitting and blogging? Does that even make sense? Haha, I don't think it does.  Also, I recently got really fast internet for our family and became hooked on YouTube, I mean I have always watched YouTube videos, but at home that meant waiting 10 minutes for a video to load before being able to watch anything. Now I can just watch video after video.  And my addiction are beauty videos and cooking videos! Okay now on to the recipe!

Okay, well I made this dish way back on Halloween and I am just getting around to posting it.  But maybe this will inspire folks to make this next Halloween? Or you can get white oreo cookies and some beachy gummy worm and make it for a summer themed party?  I actually made this dish for my co-worker who kept insisting that he really wanted some dirt pie.  And while I was at it, I made two pies, one for my office and one for my friend's kiddie Halloween party.  You can just half the ingredients and make one pie, or better if you have a trifle dish, then you can layer the oreo and creamy layers!  This was definitely a hit and believe me worth EVERY calorie ;)

Ingredients for Pie
Ingredients (2 - 9inch circle pies):
1/4 cup butter
2 - 8oz packages of cream cheese
1 cup powdered sugar
2 - instant vanilla pudding packs
3 1/2 cups milk
8oz Cool Whip
1 1/2 package of Oreo cookies
1 package Gummy Worms

Instructions:
1. In a medium bowl, make the vanilla pudding according the the instructions on the box of the instant pudding.
2. Fold in thawed cool whip.
3. In another small bowl mix the butter, cream cheese, and powder sugar.
4. Mix the ingredients from the small bowl (step 3) with the medium bowl (step 2). Mix so everything is well incorporated.
5. Smash the oreos in a Ziploc bag until they are finely chopped (should resemble dirt).  I used a food processor to eliminate the mess!
6. In your first circle dish, first lay out a layer of 'dirt' (orea crumbs), then lay out some worms for a surprise for people, lay with half the whipped creamy mixture (step 4), and top with 'dirt.'
7. Add some worms here and there to make it seem like they are coming out of the 'dirt.'
8. Repeat process for the second pie.
9. Chill for at least 2 hours.  I stored mine in the fridge overnight!
10. ENJOY!